Tales of Troubleshooting – Ep. 1 – Switch Killer

In today’s tale, we find ourselves dealing with a recently replaced Meraki switch which is, once again, showing offline.

Previously, this site had an issue where the management of the switch was inoperable, and we assumed the only fix was to swap it out with a known good switch. Today, we are finding that the same issue cropped up. Any devices connected to the switch that have static IPs are completely fine as the VLAN configs of the ports are still intact.

The findings

We also use MX devices for routing and security at the sites, so we better start there.
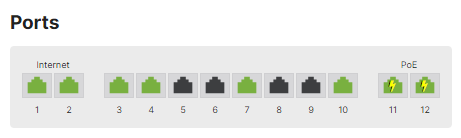
There’s a handy-dandy API call we can leverage to figure out what’s plugged into the MX ports: https://api.meraki.com/api/v1/devices/<serialNumberHere>/lldpCdp

{
    "ports": {
        "port10": {
            "cdp": {
                "sourcePort": "port10",
                "deviceId": "W60",
                "address": "192.168.1.7",
                "portId": "WAN PORT"
            },
            "lldp": {
                "sourcePort": "port10",
                "systemName": "SIP-W60B",
                "portId": "00:11:22:33:44:55"
            }
        },
        "port11": {
            "cdp": {
                "sourcePort": "port11",
                "deviceId": "0c8d00001111",
                "address": "192.168.1.4",
                "portId": "Port 0"
            },
            "lldp": {
                "sourcePort": "port11",
                "systemName": "Meraki MR33",
                "portId": "0"
            }
        },
        "port12": {
            "cdp": {
                "sourcePort": "port12",
                "deviceId": "T43U",
                "address": "192.168.1.8",
                "portId": "WAN PORT"
            },
            "lldp": {
                "sourcePort": "port12",
                "systemName": "SIP-T43U",
                "portId": "80:5e:44:55:66:77"
            }
        },
        "port3": {
            "cdp": {
                "sourcePort": "port3",
                "deviceId": "ac1788889999",
                "address": "192.168.0.5",
                "portId": "Port 24"
            },
            "lldp": {
                "sourcePort": "port3",
                "systemName": "Meraki MS120-24",
                "managementAddress": "192.168.0.5",
                "portId": "24"
            }
        }
    },
    "sourceMac": "e0:55:dd:dd:ee:ee"
}


Lo and behold, there’s our missing switch, plugged into port 3. This is not the IP scheme we use internally, so something is definitely amiss, and furthermore, this IP scheme matches what we find below. This also tells us that we’ve got something plugged into port 4 & 7 (per the dashboard UI) which are not reporting LLDP info back. Due to the way we have the VLANs setup, I know what is in port 7. Port 4 is the interesting client.

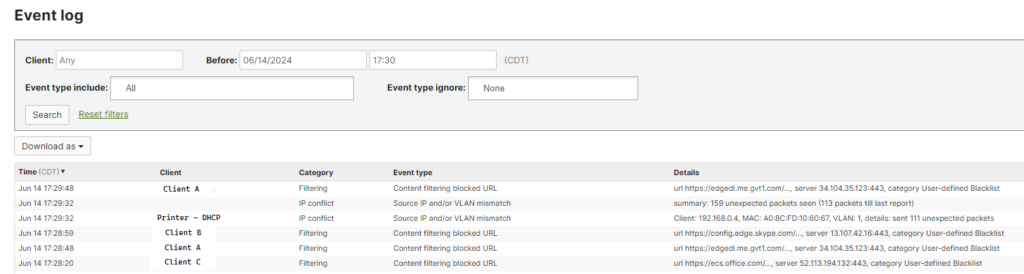
What about the event logs? Let’s take a look back at the time period in question, when it was last online.
MX:
MX with event type filter:
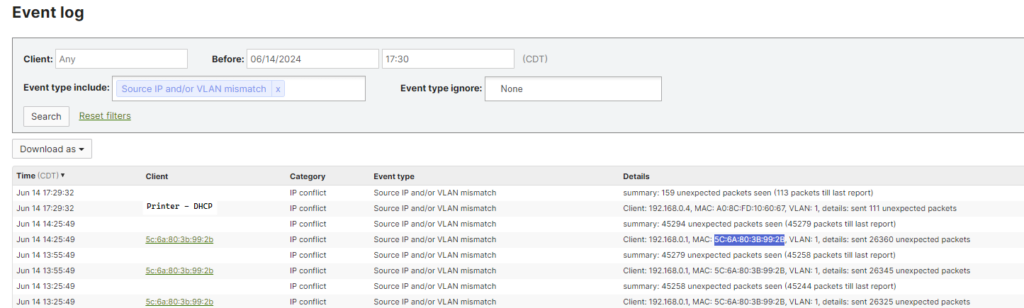
Earlier in the day another device connected and reported an IP of 192.168.0.1. Generally, I’d expect a device with that IP to be the default gateway on the network, usually some type of routing device capable of running a DHCP server. Also, this IP scheme matches what we’re seeing the printer obtain. Taking our search to a MAC OUI lookup provider – https://www.wireshark.org/tools/oui-lookup.html – we find that the manufacturer is Zyxel. If you’ve been around DSL modems in the last decade or so, this should ring a bell. CenturyLink was a big client of theirs for residential and small business services.

Smoking Gun

Once the onsite team had been contacted, we sent them on the chase to find the mysterious Zyxel device. Within a few minutes they had identified an old CenturyLink modem that was never pulled from the network cage. Powering this device down caused the management interface of the Meraki switch to pick up an IP from the MX on the network and we were on our merry way. We had a few other DHCP enabled devices which we had to cycle switchports for, but nothing major.

Conclusion

I think the Meraki and Mist platforms get a fair amount of undeserved hate from the larger networking community. Are they capable of running complex networks or advanced routing protocols? No. But what they are good at is providing a reliable cookie-cutter network for branches or remote sites. Though the API is really what I love about Meraki, having the ‘single pane of glass’ view (when you run a full stack) is really convenient for troubleshooting sessions like this.

Cowboy Scripting & Network Automation

I am an avid listener of networking/nerd podcasts out there – Heavy Networking (Packet Pushers), Network Automation Nerds (now Packet Pushers), Art of Network Engineering, amongst others. I’m also hoping to get to the AutoCon2 event in CO later this year. I consider myself a huge proponent of automation in all facets of IT, but obviously this blog, and my passion, is in the networking realm. Throughout my career, I’ve worked as the lone-wolf IT person for a small 50-person company, to being a part of a service desk at a small hospitality chain, to working on a dedicated infrastructure team for a multi-hundred-unit brand. I have not, however, worked for a large enough company that allowed me to solely focuses on one specific IT component – i.e. routing, firewall, etc. What’s my point? The “proper” way to do automation, either something free like Ansible, or paid like Itential, has never been feasible for me. There was never enough time to research, design, implement, or make a good enough business case for these frameworks.

What’s the quote again, “There’s nothing more permanent than a temporary solution.”? Either way, little scripts that perform a task have been critical to my career. One of the earliest ‘automation’ scripts I recall developing was a PowerShell script which ran through a list of DDNS entries, confirming or denying if a host (Fortinet firewall) replied or not. Maybe this isn’t something you’d consider in the same universe as network automation, but we didn’t have a source of truth at the time, and I just needed a list of reachable devices.

Network automation has seemingly exploded in recent years, and we’re starting to see an increase in both adoption, as well as options and ways to implement – APIs provided by device manufacturers & platforms which are device agnostic. That being said, we should all be chomping at the bit to pick one, or a few, and get moving, right? From my own experience, that’s still a loaded question. You might be part of a smaller org with little resources, namely time, who is forever stuck in a ‘keeping the lights on’ role. On the flip side, you might be part of a large org with too many layers of approvals and lack of buy-in from key stakeholders.

So where does that leave us? Do we feel guilty for not spending outside work time researching this stuff? Do we feel angry that our co-workers and leadership can’t see the bigger picture? Do we feel annoyed, and maybe even depressed, that we can’t bring these amazing tools into our day-to-day work? Do we feel inadequate in our roles because we hear about other teams who are leveraging automation today?

I think the answer is simply, ‘Yes’. It is normal to have a lot of feelings throughout your career, and network automation is just another stop along the journey. My experience has been more on the digital range (so to speak), where roping in JSON data from an API and mutating it before shoving it back out into another API has felt the most like home. Do I have “automation” scripts I share amongst co-workers? Of course! Are they still prone to breaking if I’m not handling all possible errors? Oh, hell yeah! Do I feel bad about it? Sometimes!

At the end of the day, I try to keep my head up, continue listening and learning, and always remember to giddy up! I’ve got a glorious bit of cowboy automation in my neck of the woods, and I’ll be damned if I ain’t proud of it!

Credit: xkcd

Epson TM-L90 TCP/IP update via PowerShell

Sometimes it’s not the networking devices that need the automating. Sometimes, you have to automate the things to fit the network. In this case, I was given the task of manually logging in and updating a bunch of Epson receipt printers to use DHCP/auto IP config instead of the static/manual IP config they have configured today.

When you hit the web UI, you’re presented with a fairly generic login popup, asking for a username and password. In this case, I was able to use the default credentials combo for nearly all of the devices, which things easy. You can use a simple Invoke-WebRequest command to initiate your connection:

Invoke-WebRequest -Uri "https://<local_printer_ip>"

This will very likely fail for a few different reasons, the first being that it redirects to HTTPS but also has a default SSL certificate which PS does not like. To get around that you just need to add the -SkipCertificateCheck parameter to the end of the code line. From here, you will find that you get an HTTP 401 auth error which will require you to pass the creds on with the request. I handled this by issuing a Get-Credential request and storing that in a variable which is passed on during the call using the -Credential parameter.

Rather than break down the rest of the findings, I’ll just share what I came up with (update <local_printer_ip> to value of your printer):

#Enter credentials to be used for login later
$c = Get-Credential

#Build a new authenticated session using credentials from above
Invoke-WebRequest -Uri 'https://<local_printer_ip>' -SessionVariable temp_session -Method GET -Credential $c -SkipCertificateCheck

#Issue update to auto/DHCP IP config
Invoke-WebRequest -UseBasicParsing -Uri 'https://<local_printer_ip>/tcp_setv4.cgi?W_IP8=4&W_IP10=0&W_IP11=1' -WebSession $temp_session -Method GET -SkipCertificateCheck

#Issue reset command to save config
Invoke-WebRequest -Uri 'https://<local_printer_ip>/reset.cgi?' -WebSession $temp_session -Method GET -SkipCertificateCheck

There are a few things to note in this so I’ll quick break them down:

  • -SessionVariable creates the session to be used, -WebSession allows you to use the session later. Variable name can be whatever you’d like, but you do not use a $ during the setup.
  • -UseBasicParsing was needed in my case I got a page not found error without it.
  • The tcp_setv4 CGI command was found using the Developer Tools in my browser, and that’s how I’d suggest finding the command for anything else you’d want to modify.
    • W_IP8 refers to the drop down menu, 1 = Manual/Static, 4 = Auto/DHCP
    • W_IP10 refers to the Set Using Automatic Private IP Addressing (APIPA) setting and is required to issue the update.
    • W_IP11 refers to the Set IP Address Using ARP + Ping setting and for Auto/DHCP needs to be set to 1, 0 would be Disable.
  • If you need to do the opposite as I’ve done here, the command to update the printer to static is:
    • https://<local_printer_ip>/tcp_setv4.cgi?W_IP8=1&W_IP1=<printer_ip>&W_IP2=<subnet_mask>&W_IP3=<gateway>&W_IP10=0&W_IP11=0
    • E.g. https://192.168.1.213/tcp_setv4.cgi?W_IP8=1&W_IP1=192.168.1.10&W_IP2=255.255.255.0&W_IP3=192.168.1.1&W_IP10=0&W_IP11=0
    • Remember to issue the reset command as that is seemingly what saves the config.

For my task, I included a few other things which included pulling in a list of printer IPs from a CSV, looping through that list and running the updates, sending the response HTTP codes to an array, and exporting that to a CSV. If you for some reason had your printers secured with different credentials, you could also include those in your initial CSV and build new credential objects during each loop.

Hope this has been helpful! And happy automating!

Azure Virtual WAN S2S VPN with Dual ISP’s & BGP

This title is a mouthful, but we’ve got dual ISP connections terminating on our active/passive HA Palo Alto’s. Historically, we’ve only had a single S2S VPN to our Azure environment, however we are now migrating to a new pair of PA’s that I need to have running concurrently. To give slightly more overview of our Azure environment, we’ve got 2 Virtual WANs setup with a single Virtual HUB each. Within these HUBs, we have a couple of S2S VPN connections, some of which use BGP for dynamic routing. The goal here is to leverage the existing Azure VPN site, and simply add a new link for the second ISP connection from the new pairing of PAs. The main documentation for this is found here: https://learn.microsoft.com/en-us/azure/virtual-wan/virtual-wan-site-to-site-portal.

First problem: The Azure portal would not allow me to create a new link using the same BGP peer IP as the other link – ISP 1.

Fix: Add additional IPv4 address to the sub-interface (e.g. BGP1: 10.10.100.2/32, BGP2: 10.10.100.3/32) on the PA side to accommodate this.

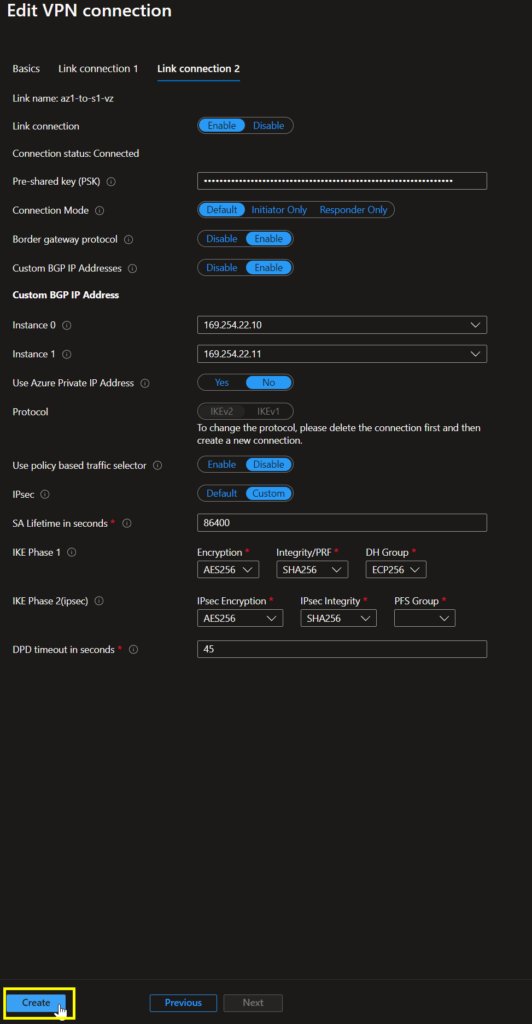
Second problem: I added the new link to the site, but the Azure portal would not let me configure the link from within the VPN site page. Every time I hit Create, the page just flashed, and nothing happened.

Fix: Disconnect that VPN site & reconnect. Yep. It really was that simple, though it was annoying to have to bring down the VPN at all as this takes a couple minutes.

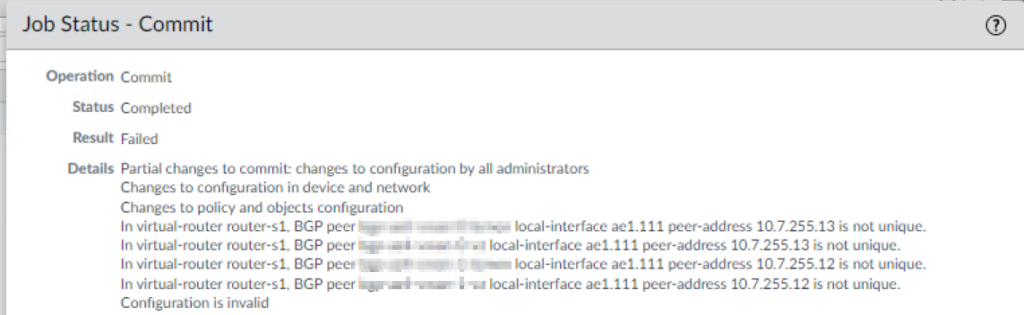
Third problem: Configuring the new BGP peering on the PA side errored out when I tried to create a 2nd peer with the same Peer Address.

Fix: This was a little more complicated. I knew we had only ever used the default Azure BGP peer IPs and I didn’t know you could add custom ones until I read through this document: https://learn.microsoft.com/en-us/azure/vpn-gateway/bgp-howto#enable-bgp-for-the-vpn-gateway. Basically, Azure allows the use of the following APIPA ranges – 169.254.21.0/24 & 169.254.22.0/24 – and you may setup as many custom BGP IPs as you need. The caveat with this setup is that your remote peer must then use an APIPA IP (169.254.0.0/16). Ugh. Back to the PA side… Instead of using 10.10.100.2 & 10.10.100.3, I chose 169.254.19.10 & 169.254.20.10.
Note: When APIPA addresses are used on VPN gateways, the gateways do not initiate BGP peering sessions with APIPA source IP addresses. The on-premises VPN device must initiate BGP peering connections.

That’s all there was to it! Now, I’ve got dynamic routing working from both pairs of HA PA’s and can gracefully cut over to the new pair. I’m leaving a lot of the PA config details out of the post here, but we’ve also got OSPF setup for pulling in routes from a Cisco Meraki MX VPN concentrator, so there’s a redistribution profile which lets me control what I’m sending across via BGP. If there are questions around that setup, I can edit and expand this post to include that detail.

Lastly, I am not seeing proper ECMP traffic flow yet, so that may be a post for another time, however I have validated that if one route drops, i.e. I remove it from the PA side, the alternate PA pairing immediately picks up.

Other helpful links: